什么是Astro
根据官网描述,Astro是集多功能于一体的 Web 框架,用于构建快速、以内容为中心的网站。可以看出Astro是一个Web框架,和Nuxt、Next.js类似的Web框架,为啥有了目前这么流行的框架存在Astro还能得到这么大的关注?
为什么要为Astro
如他文档说的目前的框架大都主要为了构建应用而设计,对内容站没有更多的优化。什么是内容站,以展示为主没有很重复杂的交互逻辑的Web程序比如文档网站、博客、出版网站等等。为啥Astro突然很火了,初次看感觉这不和Next.js、Nuxt.js不是差不多吗,为啥它出圈了?我将它理解为拼多多之于淘宝、京东,拼多多在细分的下沉做的市场更好。同样Astro在内容站的这个场景,提供了比其他框架更好的体验!那它到底好在哪儿?
- 学习成本不高。
.astro的语法和jsx比较类似 - 灵活性高。除了它自己的
.astro的方式,可以选择其他任何框架开发比如Vue、React都可以 - 提供内容站的良好支持。比如自带的
.md、.mdx解析,内容模版等等
群岛(Islands)架构
“群岛架构”由 Etsy 前端架构工程师 Katie Sylor-Miller提出,并由 Preact 的作者 Jason Miller 在这篇文章进行了扩展。
目前SSR、SSG这类应用,都是服务端直接给出 HTML 浏览器先进行渲染,然后加载 js 脚本完成事件绑定初始化数据,也就是经常听到的 hydration 的这个过程。当这个过程完成后页面才是一个完整可使用的页面。但是这个方案随着应用变大这个 hydration 的过程就会慢慢长导致可交互的事件也变长了!
群岛架构就是将页面进行拆分,拆分为静态内容、可交互岛屿两部分
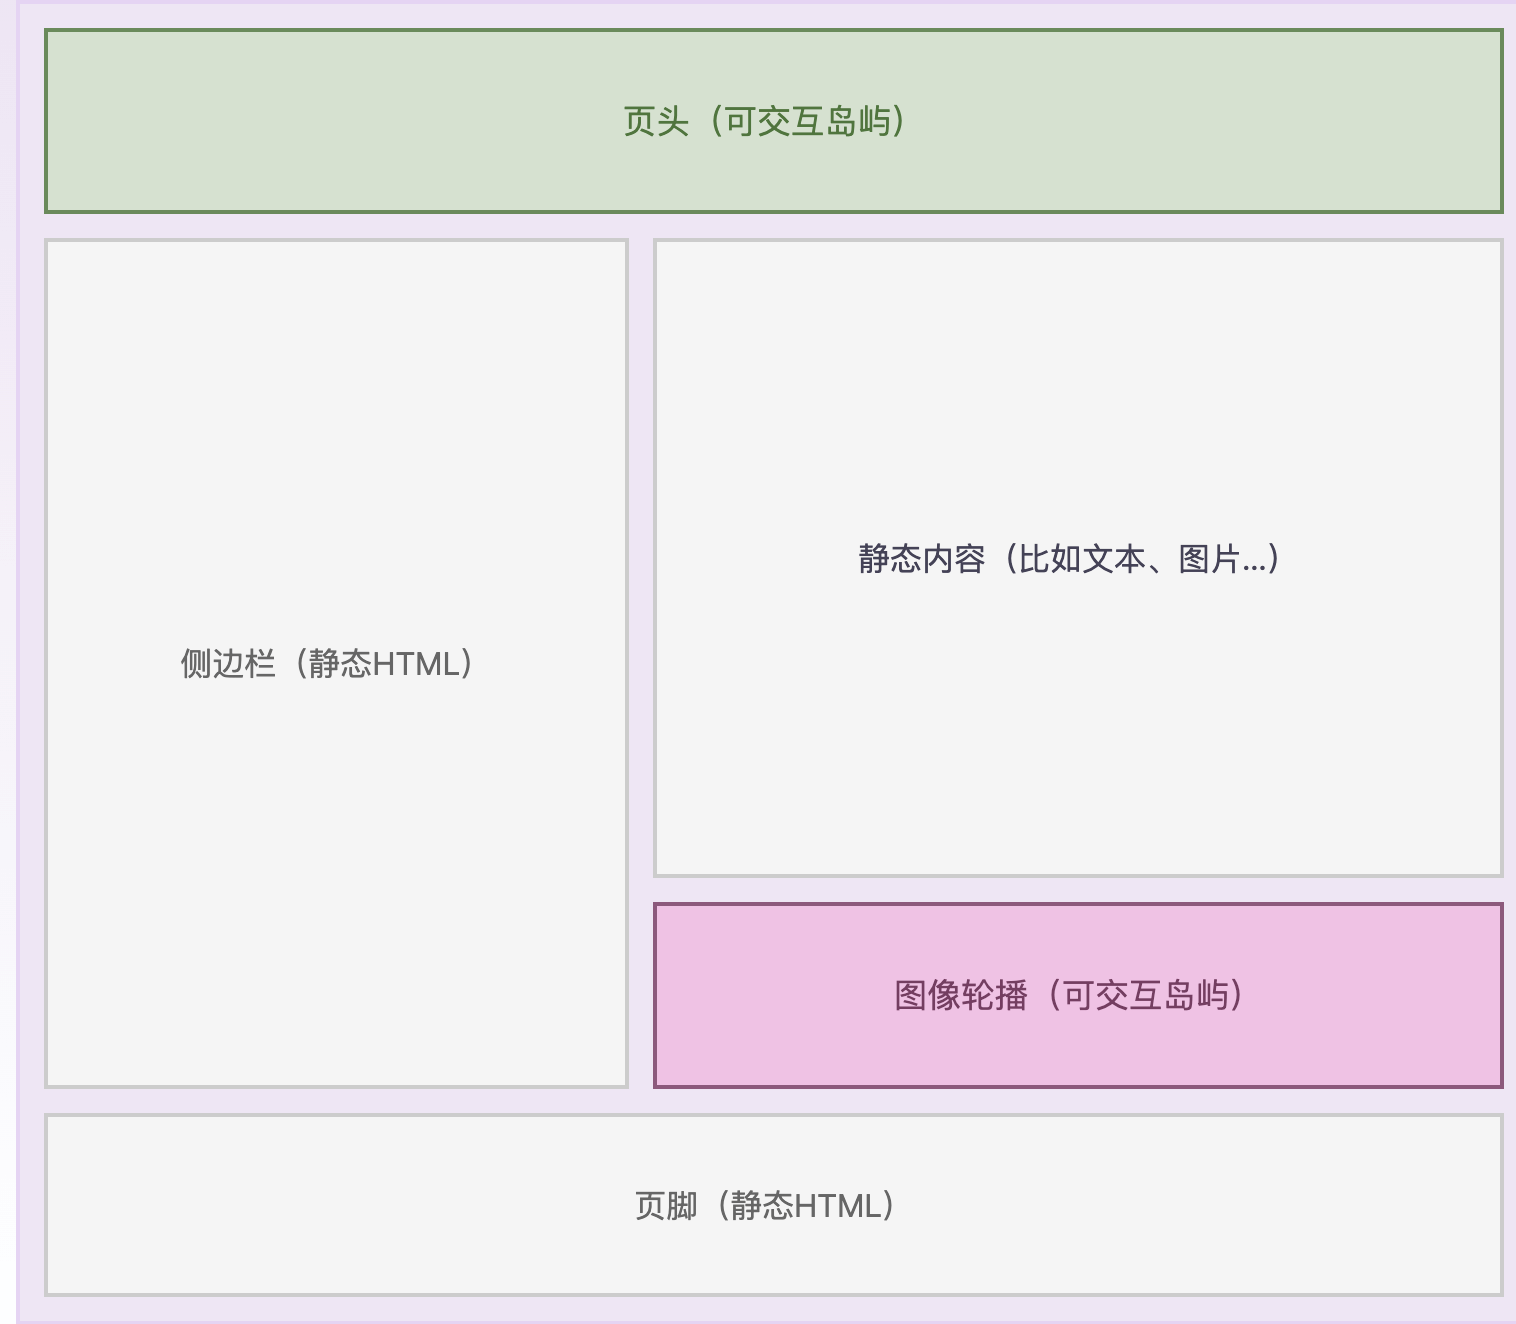 对于静态部分直接使用服务端返回的 HTML 就可以了,不用进行 hydration 这个过程,通过这种模式就可以实现局部的 hydration ,就能够减少 js 脚本的大小。
在Astro中默认组件是静态内容,对于需要交互的组件进行单独创建岛屿,这就是为啥它这么快的主要原因了。
使用Astro写Blog
搭建
前端起手式就是一个pnpm create astro@latest,安装后会提示你一些项目初始化、项目相关问题。这样一个Astro项目就创建好了。官方还提供了一个许多模板,我们可以直接选择一个 Blog 的模板,通过pnpm create astro@latest --template blog这种方式创建一个完整可用的 Blog 就可以跑起来了!
开发一个 Astro 的组件
前面提到使用过 Vue、React 的上手会比较容易,其实它提供的语法也都大同小异。在.astro文件中通过---来分割识别组件中的脚本像Vue的SFC中<script>中的内容,下面的就是一个我 Blog 中侧边目录的快速导航组件。其中Astro.props就是使用该组件的时候传入的参数,可以看到整体使用还是比较容易理解的。
---
import type { MarkdownHeading } from 'astro';

export interface Props {
  headings: MarkdownHeading[];
  title: string;
}

const { headings, title } = Astro.props;

function depthClass(depth: number) {
	const classList = ['', '', 'ml-2', 'ml-4', 'ml-6', 'ml-8', 'ml-10'];
	return classList[depth] || 'ml-10'
}
---
<>
  <a class="font-semibold text-5" href={`#${title}`}>Table of Contents</a>
  <ul class="mt-4 text-xs">
    {headings.map(({ depth, slug, text }) => (
      <li class="line-clamp-2 mt-3">
        <a
          class={`${
            depthClass(depth)
          }`}
          href={`#${slug}`}
          aria-label={`Scroll to section: ${text}`}
        >
          {text}
        </a>
      </li>
    ))}
  </ul>
</>---
import type { MarkdownHeading } from 'astro';
export interface Props {
headings: MarkdownHeading[];
title: string;
}
const { headings, title } = Astro.props;
function depthClass(depth: number) {
const classList = ['', '', 'ml-2', 'ml-4', 'ml-6', 'ml-8', 'ml-10'];
return classList[depth] || 'ml-10'
}
---
<>
<a class="font-semibold text-5" href={`#${title}`}>Table of Contents</a>
<ul class="mt-4 text-xs">
{headings.map(({ depth, slug, text }) => (
<li class="line-clamp-2 mt-3">
<a
class={`${
depthClass(depth)
}`}
href={`#${slug}`}
aria-label={`Scroll to section: ${text}`}
>
{text}
</a>
</li>
))}
</ul>
</>写Blog
如果你也是用官方的 Blog 模板来创建的,那么写一篇只需要在src/content/blog下新建你的博文即可。下面的内容放在博文的开头,它配置了一些这篇博文的一些基础信息。在下面你就可以使用 Markdown 的语法完成你的博文即可。同时可以使用pnpm preview来预览你的博文
---
title: "标题"
description: "描述"
pubDate: "发布时间"
------
title: "标题"
description: "描述"
pubDate: "发布时间"
---部署到 Github Pages
Astro 维护了一个官方的 GitHub Action withastro/action 来帮助你部署项目,我们只要简单的配置就能完成部署
- 配置
astro.config.mjs文件,提供site、base两个配置项目即可。如果你的这个项目就是你的用户的Pages那么base可以不用提供import { defineConfig } from 'astro/config' export default defineConfig({ site: 'https://astronaut.github.io', base: '/my-repo', })import { defineConfig } from 'astro/config' export default defineConfig({ site: 'https://astronaut.github.io', base: '/my-repo', }) - 在项目中
.github/workflows/目录天际一个新文件deploy.yml,并粘贴以下 YAML 配置信息name: GitHub Pages Astro CI on: # 每次推送到 `main` 分支时触发这个“工作流程” # 如果你使用了别的分支名,请按需将 `main` 替换成你的分支名 push: branches: [ main ] # 允许你在 GitHub 上的 Actions 标签中手动触发此“工作流程” workflow_dispatch: # 允许 job 克隆 repo 并创建一个 page deployment permissions: contents: read pages: write id-token: write jobs: build: runs-on: ubuntu-latest steps: - name: Checkout your repository using git uses: actions/checkout@v3 - name: Install, build, and upload your site uses: withastro/action@v0 deploy: needs: build runs-on: ubuntu-latest environment: name: github-pages url: ${{ steps.deployment.outputs.page_url }} steps: - name: Deploy to GitHub Pages id: deployment uses: actions/deploy-pages@v1name: GitHub Pages Astro CI on: # 每次推送到 `main` 分支时触发这个“工作流程” # 如果你使用了别的分支名,请按需将 `main` 替换成你的分支名 push: branches: [ main ] # 允许你在 GitHub 上的 Actions 标签中手动触发此“工作流程” workflow_dispatch: # 允许 job 克隆 repo 并创建一个 page deployment permissions: contents: read pages: write id-token: write jobs: build: runs-on: ubuntu-latest steps: - name: Checkout your repository using git uses: actions/checkout@v3 - name: Install, build, and upload your site uses: withastro/action@v0 deploy: needs: build runs-on: ubuntu-latest environment: name: github-pages url: ${{ steps.deployment.outputs.page_url }} steps: - name: Deploy to GitHub Pages id: deployment uses: actions/deploy-pages@v1 - 在 Github 的项目仓库设置里的 Pages 设置,将部署来源选择为 GitHub Action
这样配置完成后每次写完新的 Blog 推送到 main 分支就会触发自动部署。
体验
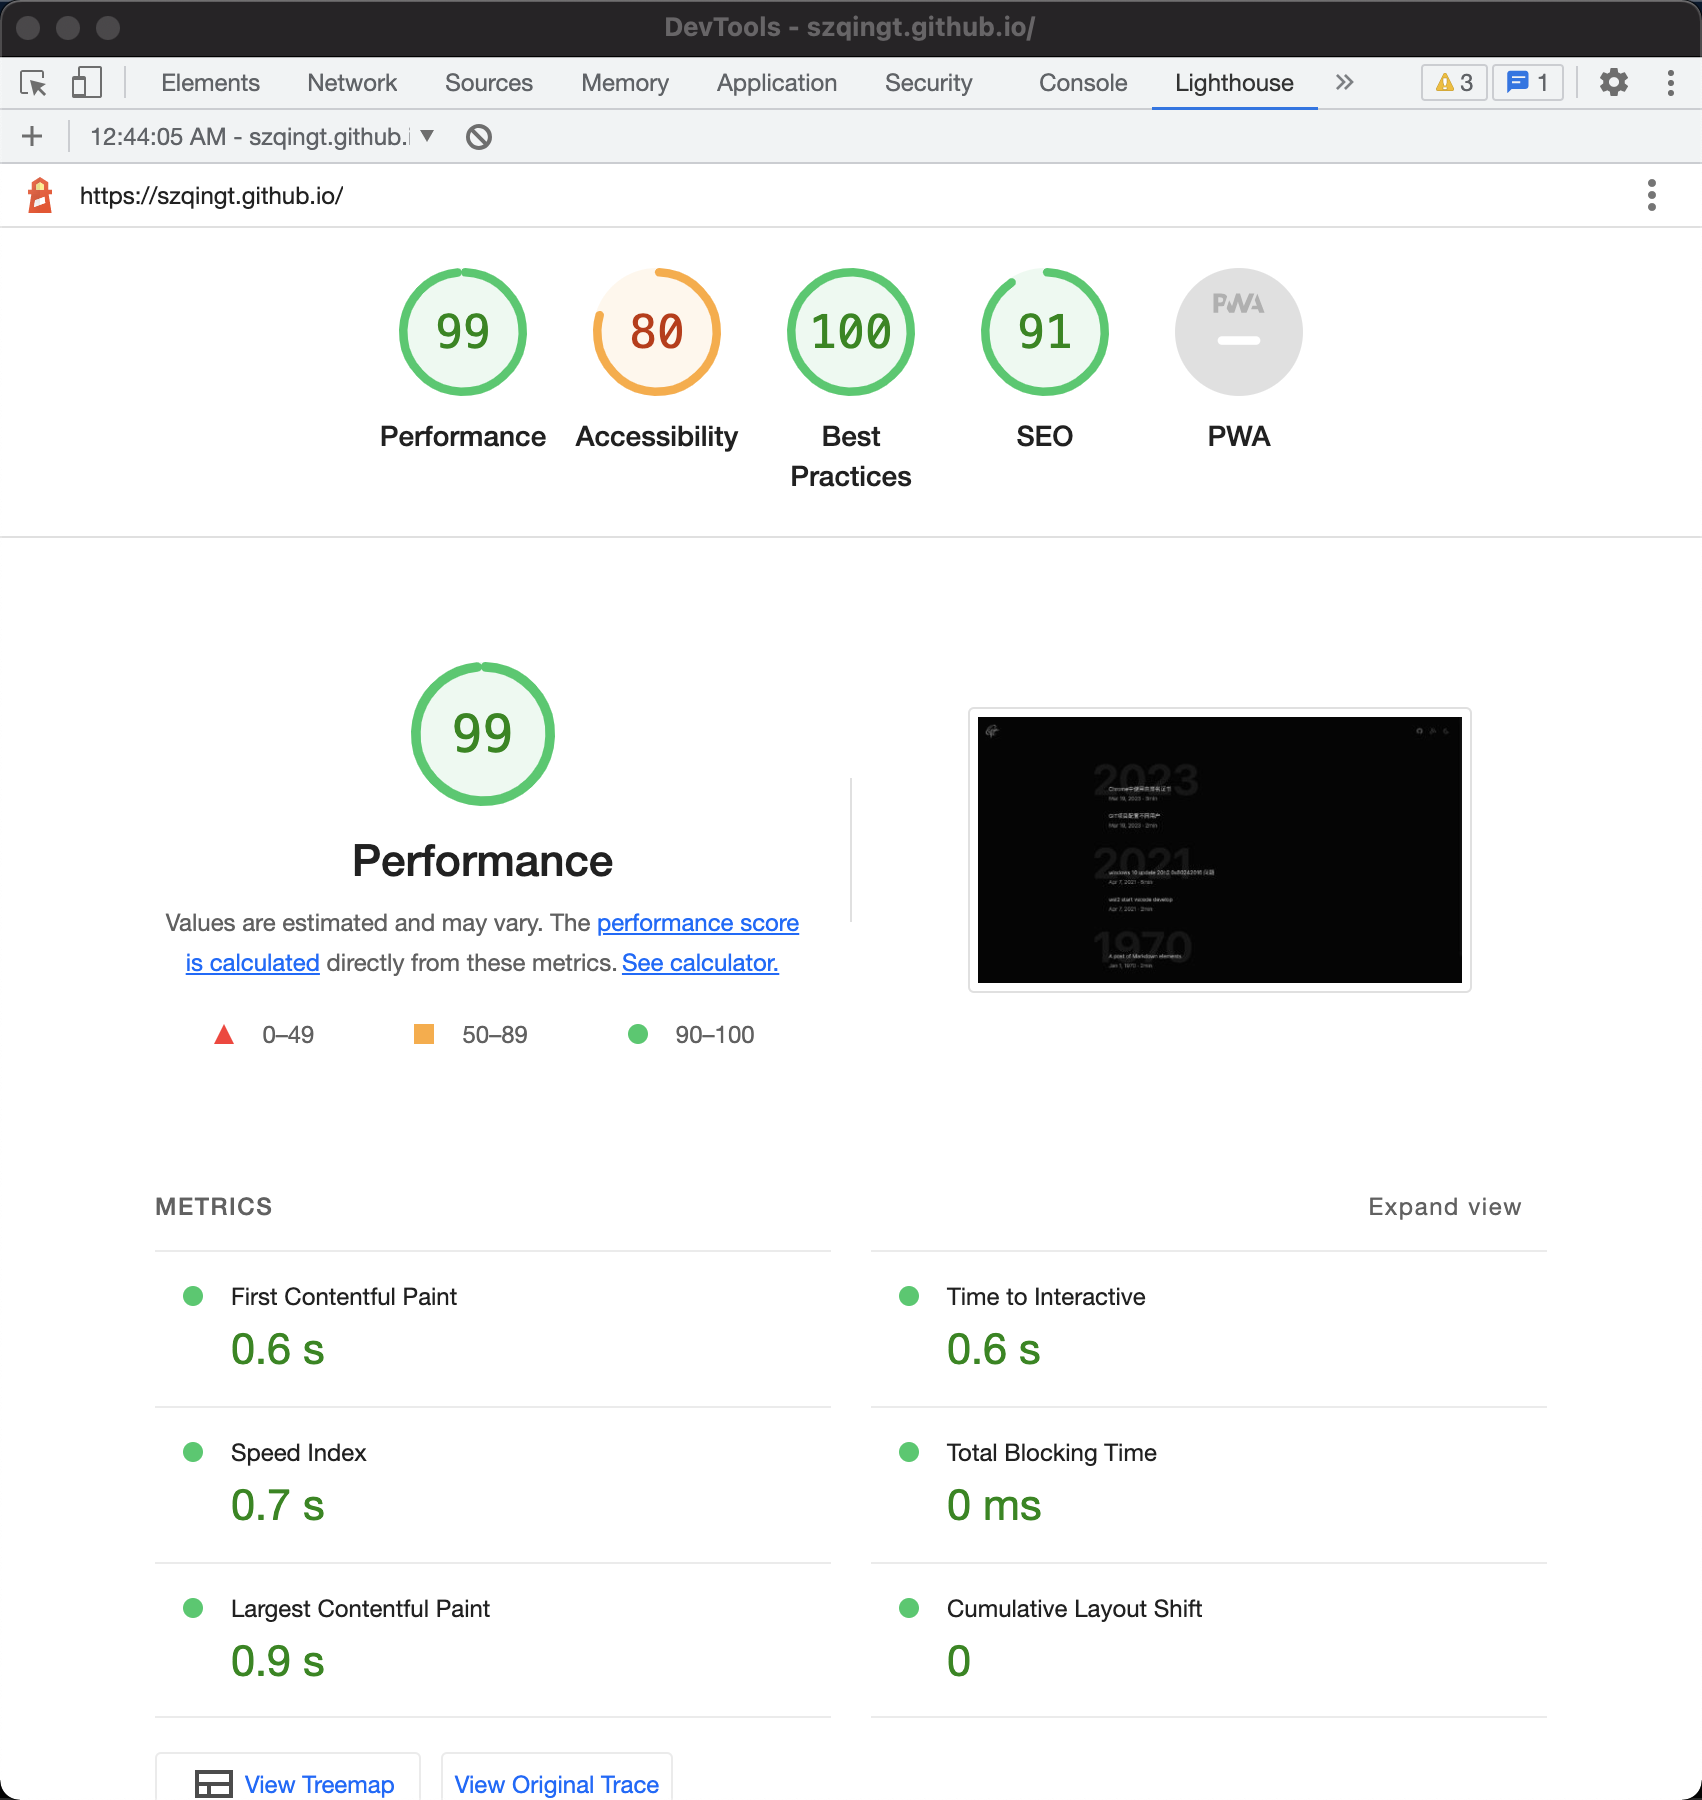
整体将Hexo切换到Astro还是很轻松的,Blog需要要基础能力都提供了,周边的生态也比较多!使用上浏览体验有很大的提升。放一个官方常吹的 Lighthouse score